서론

AWS 프리티어는 이미 다른 서비스가 이용하고 있고 Java를 지원해주는 클라우드 서비스가 없었는데 heroku를 발견하여 사용방법을 정리 해둔다.

참고로 데이터베이스는 한글을 지원하지 않는다.


본론

  1. heroku 회원 가입
  1. App 생성

위에 보이는 create a new app 버튼을 클릭하고

App name을 지정해야 하는데 이미 heroku에 존재하는 service의 name은 생성 할 수 없고,
여기서 지정한 App name으로 호스팅 될 URL이 생성된다.

  1. heroku CLI 설치

생성이 완료되면 위 화면처럼 Deploy tab으로 이동되는데 설명되어 있는 것 처럼 먼저 Heroku CLI를 자신의 OS 버전에 맞게 설치한다.

  1. Procfile 생성

Heroku는 실행 할 때 마다 port를 자동으로 지정해주는데 port를 고정시키기 위해 우선 application.properties에 port를 바인딩 해준다.

application.properties

1
server.port=${port:8080}

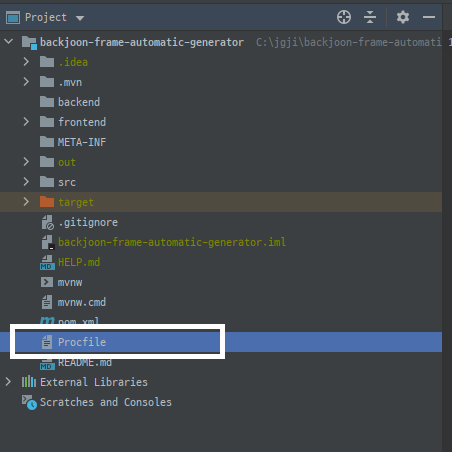
그 후 Procfile을 Project 루트 디렉토리에 확장자 없이 생성하고 아래와 같이 작성한다.

1
web: java -Dserver.port=$PORT $JAVA_OPTS -jar [실행될 jar파일 경로]

Procfile의 경로

  1. 배포

이후엔 heroku의 가이드를 그대로 따라하면 된다.

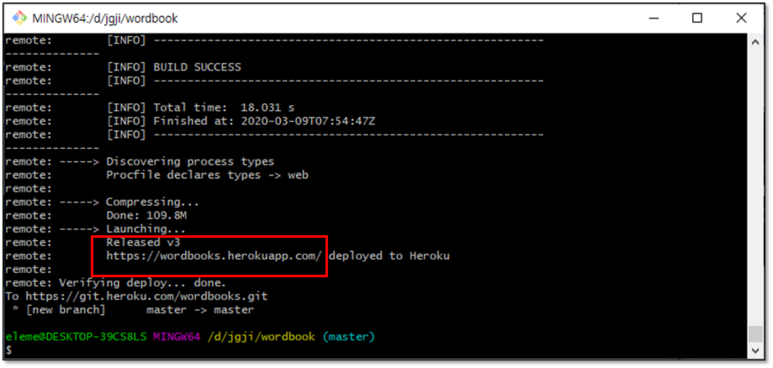
모든 가이드를 정상적으로 잘 따라하면 위 처럼 접속할 수 있는 URL이 출력되고 해당 URL로 접속하면

  1. 확인

https://backjoonframeautomaticgenerat.herokuapp.com/

정상적으로 실행되어 서비스가 실행되는 것을 확인 할 수 있다.


결론

데이터베이스를 사용하지 않는 서비스나, 한글이 입력되지 않는 서비스의 경우 무료로 이용 할 수 있는 좋은 클라우드 서비스 인 것 같다.

참고로 30분간 접속이 없으면 휴면 모드로 전환되어 최초 접속이 다소 느릴 수 있으나 무료 서비스인 만큼 그정도는 감안해주자.

이 글에 소개한 CLI를 이용한 방법 말고 Github와 연결해서 branch에 push하면 자동으로 배포되게 할 수 도 있는 것 같으니 찾아보고 적용하면 이 방법 보다 더 편할 것이다.


참고 사이트

댓글 공유

  • page 1 of 1

Junggu Ji

author.bio


author.job

(TimeoutException var21) {
if (!subscribeFuture.completeExceptionally(new RedisTimeoutException("Unable to acquire subscription lock after " + time + "ms. Try to increase 'subscriptionsPerConnection' and/or 'subscriptionConnectionPoolSize' parameters."))) {
subscribeFuture.whenComplete((res, ex) -> {
if (ex == null) {
this.unsubscribe(res, threadId);
}

});
}

this.acquireFailed(waitTime, unit, threadId);
return false;
} catch (ExecutionException var22) {
ExecutionException e = var22;
LOGGER.error(e.getMessage(), e);
this.acquireFailed(waitTime, unit, threadId);
return false;
}

boolean var16;
try {
time -= System.currentTimeMillis() - current;
if (time <= 0L) {
this.acquireFailed(waitTime, unit, threadId);
boolean var25 = false;
return var25;
}

do {
long currentTime = System.currentTimeMillis();
ttl = this.tryAcquire(waitTime, leaseTime, unit, threadId);
if (ttl == null) {
var16 = true;
return var16;
}

time -= System.currentTimeMillis() - currentTime;
if (time <= 0L) {
this.acquireFailed(waitTime, unit, threadId);
var16 = false;
return var16;
}

currentTime = System.currentTimeMillis();
if (ttl >= 0L && ttl < time) {
((RedissonLockEntry)this.commandExecutor.getNow(subscribeFuture)).getLatch().tryAcquire(ttl, TimeUnit.MILLISECONDS);
} else {
((RedissonLockEntry)this.commandExecutor.getNow(subscribeFuture)).getLatch().tryAcquire(time, TimeUnit.MILLISECONDS);
}

time -= System.currentTimeMillis() - currentTime;
} while(time > 0L);

this.acquireFailed(waitTime, unit, threadId);
var16 = false;
} finally {
this.unsubscribe((RedissonLockEntry)this.commandExecutor.getNow(subscribeFuture), threadId);
}

return var16;
}
}
}

1. 최초 락 획득 시도

1
2
3
4
5
6
7
Long ttl = this.tryAcquire(waitTime, leaseTime, unit, threadId);
if (ttl == null) {
return true;
} else {
// ttl != null이면 락이 선점되어 있음을 의미
...
}

2. 타이머 갱신

1
2
3
4
5
6
7
time -= System.currentTimeMillis() - current;
if (time <= 0L) {
this.acquireFailed(waitTime, unit, threadId);
return false;
} else {
...
}

3. 락에 대한 pub/sub 채널 구독

1
2
3
4
5
6
7
8
9
10
current = System.currentTimeMillis();
CompletableFuture<RedissonLockEntry> subscribeFuture = this.subscribe(threadId);

try {
subscribeFuture.get(time, TimeUnit.MILLISECONDS);
} catch (TimeoutException var21) {
...
} catch (ExecutionException var22) {
...
}
1
2
3
protected CompletableFuture<RedissonLockEntry> subscribe(long threadId) {
return this.pubSub.subscribe(this.getEntryName(), this.getChannelName());
}
1
2
3
4
5
6
7
8
9
10
11
12
13
14
15
16
17
18
19
20
21
22
23
24
25
26
27
28
29
30
31
32
33
34
35
36
37
38
39
40
41
42
43
44
45
46
47
48
49
50
51
52
53
54
55
56
57
58
59
60
61
62
63
64
public CompletableFuture<E> subscribe(String entryName, String channelName) {
// a. Semaphore 생성 및 acquire 호출
AsyncSemaphore semaphore = this.service.getSemaphore(new ChannelName(channelName));
CompletableFuture<E> newPromise = new CompletableFuture();
semaphore.acquire().thenAccept((c) -> {
if (newPromise.isDone()) {
semaphore.release();
} else {
// b. Pub/Sub 채널 확인 및 생성
E entry = (PubSubEntry)this.entries.get(entryName);
if (entry != null) {
// (1) 기존 엔트리가 있는 경우
entry.acquire();
semaphore.release();
entry.getPromise().whenComplete((r, e) -> {
if (e != null) {
newPromise.completeExceptionally(e);
} else {
newPromise.complete(r);
}
});
} else {
// (2) 새로운 엔트리를 생성
E value = this.createEntry(newPromise);
value.acquire();
E oldValue = (PubSubEntry)this.entries.putIfAbsent(entryName, value);
if (oldValue != null) {
oldValue.acquire();
semaphore.release();
oldValue.getPromise().whenComplete((r, e) -> {
if (e != null) {
newPromise.completeExceptionally(e);
} else {
newPromise.complete(r);
}
});
} else {
// (3) Redis Pub/Sub 연결 로직 수행
RedisPubSubListener<Object> listener = this.createListener(channelName, value);
CompletableFuture<PubSubConnectionEntry> s = this.service.subscribeNoTimeout(LongCodec.INSTANCE, channelName, semaphore, new RedisPubSubListener[]{listener});
newPromise.whenComplete((r, e) -> {
if (e != null) {
s.completeExceptionally(e);
}

});
// (4) Pub/Sub 구독 상태 관리 및 실패 처리
s.whenComplete((r, e) -> {
if (e != null) {
this.entries.remove(entryName);
value.getPromise().completeExceptionally(e);
} else {
if (!value.getPromise().complete(value) && value.getPromise().isCompletedExceptionally()) {
this.entries.remove(entryName);
}

}
});
}
}
}
});
return newPromise;
}

a. Semaphore 생성 및 acquire 호출

1
2
3
4
5
6
7
8
9
10
AsyncSemaphore semaphore = this.service.getSemaphore(new ChannelName(channelName));
CompletableFuture<E> newPromise = new CompletableFuture();
semaphore.acquire().thenAccept((c) -> {
if (newPromise.isDone()) {
semaphore.release();
} else {
...
}
...
});

b. Pub/Sub 채널 확인 및 생성

1
2
3
4
5
6
7
8
9
10
11
12
13
14
15
16
17
18
19
20
21
22
23
24
25
26
27
28
29
30
31
32
33
34
35
36
37
38
39
40
41
42
43
44
45
46
47
48
49
50
51
E entry = (PubSubEntry)this.entries.get(entryName);
if (entry != null) {
// (1) 기존 엔트리가 있는 경우
entry.acquire();
semaphore.release();
entry.getPromise().whenComplete((r, e) -> {
if (e != null) {
newPromise.completeExceptionally(e);
} else {
newPromise.complete(r);
}
});
} else {
// (2) 새로운 엔트리를 생성
E value = this.createEntry(newPromise);
value.acquire();
E oldValue = (PubSubEntry)this.entries.putIfAbsent(entryName, value);
if (oldValue != null) {
oldValue.acquire();
semaphore.release();
oldValue.getPromise().whenComplete((r, e) -> {
if (e != null) {
newPromise.completeExceptionally(e);
} else {
newPromise.complete(r);
}
});
} else {
// (3) Redis Pub/Sub 연결 로직 수행
RedisPubSubListener<Object> listener = this.createListener(channelName, value);
CompletableFuture<PubSubConnectionEntry> s = this.service.subscribeNoTimeout(LongCodec.INSTANCE, channelName, semaphore, new RedisPubSubListener[]{listener});
newPromise.whenComplete((r, e) -> {
if (e != null) {
s.completeExceptionally(e);
}

});
// (4) Pub/Sub 구독 상태 관리 및 실패 처리
s.whenComplete((r, e) -> {
if (e != null) {
this.entries.remove(entryName);
value.getPromise().completeExceptionally(e);
} else {
if (!value.getPromise().complete(value) && value.getPromise().isCompletedExceptionally()) {
this.entries.remove(entryName);
}

}
});
}
}

(1) 기존 채널이 있는 경우:

1
2
3
4
5
6
7
8
9
entry.acquire();
semaphore.release();
entry.getPromise().whenComplete((r, e) -> {
if (e != null) {
newPromise.completeExceptionally(e);
} else {
newPromise.complete(r);
}
});

(2) 새 채널을 생성하는 경우:

1
2
3
4
5
6
7
8
9
10
11
12
13
E value = this.createEntry(newPromise);
value.acquire();
E oldValue = (PubSubEntry)this.entries.putIfAbsent(entryName, value);
if (oldValue != null) {
oldValue.acquire();
semaphore.release();
oldValue.getPromise().whenComplete((r, e) -> {
if (e != null) {
newPromise.completeExceptionally(e);
} else {
newPromise.complete(r);
}
});

(3) Redis Pub/Sub 채널 연결:

1
2
3
4
5
6
7
8
RedisPubSubListener<Object> listener = this.createListener(channelName, value);
CompletableFuture<PubSubConnectionEntry> s = this.service.subscribeNoTimeout(LongCodec.INSTANCE, channelName, semaphore, new RedisPubSubListener[]{listener});
newPromise.whenComplete((r, e) -> {
if (e != null) {
s.completeExceptionally(e);
}

});

(4) Pub/Sub 구독 상태 관리 및 실패 처리:

1
2
3
4
5
6
7
8
9
10
11
s.whenComplete((r, e) -> {
if (e != null) {
this.entries.remove(entryName);
value.getPromise().completeExceptionally(e);
} else {
if (!value.getPromise().complete(value) && value.getPromise().isCompletedExceptionally()) {
this.entries.remove(entryName);
}

}
});

c. 락에 대한 Pub/Sub 채널 구독 정리

1. Semaphore 생성 및 acquire 호출

2. Pub/Sub 채널 확인 및 생성

3. Redis Pub/Sub 채널 연결

4. Pub/Sub 구독 상태 관리 및 실패 처리

결과적으로

여기까지가 락 이벤트를 감지하기 위한 Pub/Sub 채널에 구독하기 위한 로직이다.

4. 락 획득 재시도 및 Latch 대기 로직

1
2
3
4
5
6
7
8
9
10
11
12
13
14
15
16
17
18
19
20
21
22
23
24
25
26
27
do {
long currentTime = System.currentTimeMillis();
ttl = this.tryAcquire(waitTime, leaseTime, unit, threadId);
if (ttl == null) {
var16 = true;
return var16;
}

time -= System.currentTimeMillis() - currentTime;
if (time <= 0L) {
this.acquireFailed(waitTime, unit, threadId);
var16 = false;
return var16;
}

currentTime = System.currentTimeMillis();
if (ttl >= 0L && ttl < time) {
((RedissonLockEntry)this.commandExecutor.getNow(subscribeFuture)).getLatch().tryAcquire(ttl, TimeUnit.MILLISECONDS);
} else {
((RedissonLockEntry)this.commandExecutor.getNow(subscribeFuture)).getLatch().tryAcquire(time, TimeUnit.MILLISECONDS);
}

time -= System.currentTimeMillis() - currentTime;
} while(time > 0L);

this.acquireFailed(waitTime, unit, threadId);
var16 = false;

a. 락 획득 재시도

b. 남은 시간 갱신

c. Latch 대기

d. 반복 조건

5. 구독 해제

1
2
3
} finally {
this.unsubscribe((RedissonLockEntry)this.commandExecutor.getNow(subscribeFuture), threadId);
}

tryLock()의 장점 및 한계

장점

  1. 효율적인 이벤트 기반 처리

  2. 정교한 타이머 관리

  3. 안정적인 자원 정리

  4. Latch를 활용한 동기화

한계

  1. 락 획득 시도와 Pub/Sub의 비동기 처리 간의 간격

  1. Pub/Sub 메시지 손실 가능성

  2. 복잡한 로직으로 인한 디버깅 난이도

결론

Redisson의 tryLock()은 분산 환경에서 동시성 제어를 효과적으로 구현하기 위해 설계된 복잡한 로직을 제공한다.

tryLock()은 동시성 제어에서 효율성과 안정성을 동시에 추구하는 설계로, 분산 환경에서의 락 처리 문제를 효과적으로 해결한다. 그러나 복잡한 로직 구조와 Pub/Sub 시스템의 특성을 고려하여 사용 환경에 적합한 설정을 적용하고, 잠재적인 한계를 관리할 수 있는 보완책을 함께 설계해야 한다.

본 글이 tryLock() 내부 로직에 대한 깊은 이해를 돕고, 동시성 제어가 필요한 시스템 설계 시 참고 자료가 되길 바라며, 실제적으로 Redisson을 활용하여 분산락을 적용하고자 하는 사용자는 이전 글 동시성 이슈와 Redis( Redisson )를 이용한 해결방법을 참고하길 바란다.

댓글 공유

서론

Front를 Vue.js, Back을 Spring Boot로 만든 토이 프로젝트에서 CORS로 인해 통신이 되지 않는 오류가 발생하여 문제를 해결한 방법을 작성 해둔다.


문제 상황

화면에서 체크박스를 클릭하면 서버로 requert를 보내고 서버에서 그에 맞는 response를 주는 방식에 간단한 프로젝트 인데 클릭 시 아래 이미지 처럼 ‘Network Error’라는 alert를 발생시키고 통신이 되지 않는 문제가 발생 하였고, 개발자 도구로 콘솔을 확인해보니 아래 이미지 처럼 ‘CORS Preflight Did Not Succeed’과

교차 출처 요청 차단: 동일 출처 정책으로 인해 http://localhost:9312/frame에 있는 원격 자원을 차단하였습니다. (원인: CORS 사전 점검 응답 실패).

라는 메시지가 출력된 것을 확인했다.


해결 방법

여러 가지 방법이 있겠지만 필자는 WebMvcConfigurer를 상속받아 설정을 추가해주는 방식으로 처리했다.

1
2
3
4
5
6
7
8
9
10
11
12
13
14
15
import org.springframework.context.annotation.Configuration;
import org.springframework.web.servlet.config.annotation.CorsRegistry;
import org.springframework.web.servlet.config.annotation.WebMvcConfigurer;

@Configuration
public class WebConfig implements WebMvcConfigurer {

@Override
public void addCorsMappings(CorsRegistry registry) {
registry.addMapping("/**")
.allowedOrigins("http://localhost:8080")
.allowCredentials(true);
}
}

  1. 위 코드 처럼 WebMvcConfigurer 를 상속받는 WebConfig class를 작성한다.
  2. 그 중 addCorsMappings() 메서드를 override 한다.
  3. CorsRegistry 클래스의 addMapping() 메서드를 통해 CORS 요청 처리를 활성화할 URL를 지정하는데 이 때 “/**” 같은 Ant 스타일 패턴이나 정확한 경로(ex /admin)를 지정하는 것도 가능하다.
  4. 그 후 allowedOrigins() 메서드에서 CORS 요청을 허용 할 URL를 지정한다.
  5. 참고로 allowCredentials 설정을 true로 줬는데 이렇게 Access-Control-Allow-Credentials를 true로 할 경우 allowedOrigins()에서 “*”로 해서 모든 요청에 대해 CORS를 허용 할 수 없다.

이 방법 외엔 @Crossorigin을 이용해 개별 클래스 혹은 메서드에 CORS 요청 인증을 응답하도록 설정 하는 것도 가능하다.

정상 동작한 모습


여담

이전에 개발 할 때는 설정하지 않아도 잘 됐던거 같은데 오랜만에 프로젝트를 클론받아 실행하니 동작하지 않아 당황했다… 왜 그럴까?


참고 사이트

댓글 공유

Junggu Ji

author.bio


author.job