서론

AWS 프리티어는 이미 다른 서비스가 이용하고 있고 Java를 지원해주는 클라우드 서비스가 없었는데 heroku를 발견하여 사용방법을 정리 해둔다.

참고로 데이터베이스는 한글을 지원하지 않는다.


본론

  1. heroku 회원 가입
  1. App 생성

위에 보이는 create a new app 버튼을 클릭하고

App name을 지정해야 하는데 이미 heroku에 존재하는 service의 name은 생성 할 수 없고,
여기서 지정한 App name으로 호스팅 될 URL이 생성된다.

  1. heroku CLI 설치

생성이 완료되면 위 화면처럼 Deploy tab으로 이동되는데 설명되어 있는 것 처럼 먼저 Heroku CLI를 자신의 OS 버전에 맞게 설치한다.

  1. Procfile 생성

Heroku는 실행 할 때 마다 port를 자동으로 지정해주는데 port를 고정시키기 위해 우선 application.properties에 port를 바인딩 해준다.

application.properties

1
server.port=${port:8080}

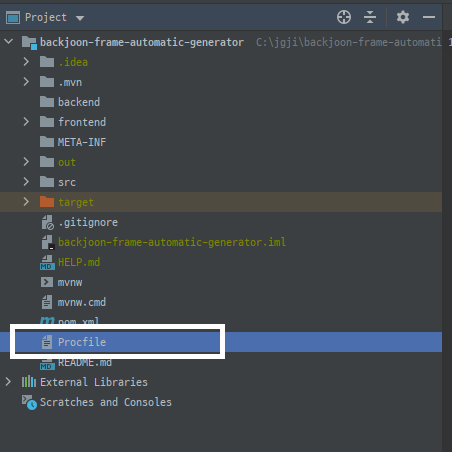
그 후 Procfile을 Project 루트 디렉토리에 확장자 없이 생성하고 아래와 같이 작성한다.

1
web: java -Dserver.port=$PORT $JAVA_OPTS -jar [실행될 jar파일 경로]

Procfile의 경로

  1. 배포

이후엔 heroku의 가이드를 그대로 따라하면 된다.

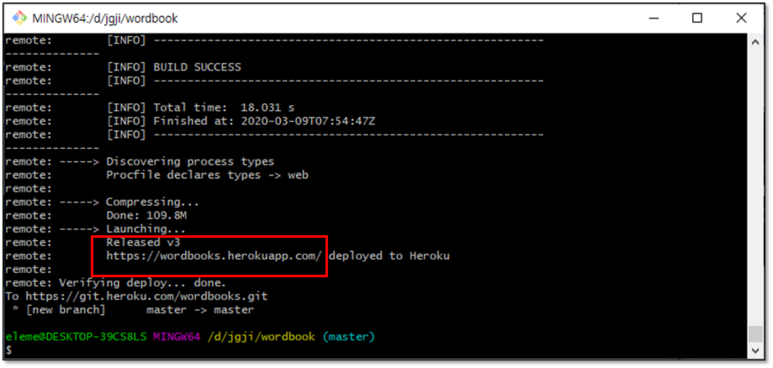
모든 가이드를 정상적으로 잘 따라하면 위 처럼 접속할 수 있는 URL이 출력되고 해당 URL로 접속하면

  1. 확인

https://backjoonframeautomaticgenerat.herokuapp.com/

정상적으로 실행되어 서비스가 실행되는 것을 확인 할 수 있다.


결론

데이터베이스를 사용하지 않는 서비스나, 한글이 입력되지 않는 서비스의 경우 무료로 이용 할 수 있는 좋은 클라우드 서비스 인 것 같다.

참고로 30분간 접속이 없으면 휴면 모드로 전환되어 최초 접속이 다소 느릴 수 있으나 무료 서비스인 만큼 그정도는 감안해주자.

이 글에 소개한 CLI를 이용한 방법 말고 Github와 연결해서 branch에 push하면 자동으로 배포되게 할 수 도 있는 것 같으니 찾아보고 적용하면 이 방법 보다 더 편할 것이다.


참고 사이트

댓글 공유

서론

연관관계에 있는 객체를 가져와서 set 하는 메서드를 테스트 하는 도중 아래와 같은 에러가 발생하였다.


본론

해당 에러

1
2
3
4
5
6
7
8
9
10
11
12
13
14
15
16
17
18
19
20
21
22
23
24
25
26
27
28
29
30
31
32
33
34
35
36
37
org.hibernate.LazyInitializationException: failed to lazily initialize a collection of role: com.jjlee.wedding.payment.domain.Cost.costOptions, no session or session was closed

at org.hibernate.collection.AbstractPersistentCollection.throwLazyInitializationException(AbstractPersistentCollection.java:383)
at org.hibernate.collection.AbstractPersistentCollection.throwLazyInitializationExceptionIfNotConnected(AbstractPersistentCollection.java:375)
at org.hibernate.collection.AbstractPersistentCollection.readSize(AbstractPersistentCollection.java:122)
at org.hibernate.collection.PersistentBag.size(PersistentBag.java:248)
at com.xxxxxx.ImplTest.가져와서_셋해야하는지_테스트(CostServiceImplTest.java:89)
at sun.reflect.NativeMethodAccessorImpl.invoke0(Native Method)
at sun.reflect.NativeMethodAccessorImpl.invoke(NativeMethodAccessorImpl.java:62)
at sun.reflect.DelegatingMethodAccessorImpl.invoke(DelegatingMethodAccessorImpl.java:43)
at java.lang.reflect.Method.invoke(Method.java:498)
at org.junit.runners.model.FrameworkMethod$1.runReflectiveCall(FrameworkMethod.java:59)
at org.junit.internal.runners.model.ReflectiveCallable.run(ReflectiveCallable.java:12)
at org.junit.runners.model.FrameworkMethod.invokeExplosively(FrameworkMethod.java:56)
at org.junit.internal.runners.statements.InvokeMethod.evaluate(InvokeMethod.java:17)
at org.junit.internal.runners.statements.RunBefores.evaluate(RunBefores.java:26)
at org.springframework.test.context.junit4.statements.RunBeforeTestMethodCallbacks.evaluate(RunBeforeTestMethodCallbacks.java:75)
at org.springframework.test.context.junit4.statements.RunAfterTestMethodCallbacks.evaluate(RunAfterTestMethodCallbacks.java:86)
at org.springframework.test.context.junit4.statements.SpringRepeat.evaluate(SpringRepeat.java:84)
at org.junit.runners.ParentRunner.runLeaf(ParentRunner.java:366)
at org.springframework.test.context.junit4.SpringJUnit4ClassRunner.runChild(SpringJUnit4ClassRunner.java:252)
at org.springframework.test.context.junit4.SpringJUnit4ClassRunner.runChild(SpringJUnit4ClassRunner.java:94)
at org.junit.runners.ParentRunner$4.run(ParentRunner.java:331)
at org.junit.runners.ParentRunner$1.schedule(ParentRunner.java:79)
at org.junit.runners.ParentRunner.runChildren(ParentRunner.java:329)
at org.junit.runners.ParentRunner.access$100(ParentRunner.java:66)
at org.junit.runners.ParentRunner$2.evaluate(ParentRunner.java:293)
at org.springframework.test.context.junit4.statements.RunBeforeTestClassCallbacks.evaluate(RunBeforeTestClassCallbacks.java:61)
at org.springframework.test.context.junit4.statements.RunAfterTestClassCallbacks.evaluate(RunAfterTestClassCallbacks.java:70)
at org.junit.runners.ParentRunner$3.evaluate(ParentRunner.java:306)
at org.junit.runners.ParentRunner.run(ParentRunner.java:413)
at org.springframework.test.context.junit4.SpringJUnit4ClassRunner.run(SpringJUnit4ClassRunner.java:191)
at org.junit.runner.JUnitCore.run(JUnitCore.java:137)
at com.intellij.junit4.JUnit4IdeaTestRunner.startRunnerWithArgs(JUnit4IdeaTestRunner.java:68)
at com.intellij.rt.junit.IdeaTestRunner$Repeater.startRunnerWithArgs(IdeaTestRunner.java:33)
at com.intellij.rt.junit.JUnitStarter.prepareStreamsAndStart(JUnitStarter.java:230)
at com.intellij.rt.junit.JUnitStarter.main(JUnitStarter.java:58)

이 때 디버깅을 해보면 연결된 entitiy에서

1
Unable to evaluate the expression Method threw 'org.hibernate.LazyInitializationException' exception.

라는 에러가 발생해 있는데 이는 결국 select 한 entitiy가 영속성 컨텍스트 내에 존재하지 않기 때문에 발생한 애러이다.
위 에러에서 말하는 세션이 바로 영속성 컨텍스트를 말하는 것이고, 이는 한 트랜잭션안에 해당 entitiy가 존재하지 않다는 것과 같은 말이다.

해결

이를 해결하기 위해선 현재 지연로딩으로 되어있는 연관관계를 즉시로딩으로 변경하여 한번에 가져오던가,
혹은 Test 메서드에 @Transactional 어노테이션을 줘서 트랜잭션 내에 존재하도록 해주면 테스트가 정상적으로 통과되게 된다.

결과


참고 사이트

댓글 공유

서론

현재 작업 중인 프로젝트에서 테스트 코드를 작성해 테스트할 일이 있었는데 프로젝트의 환경은 spring 4.3에 Junit 4.8이었다.

이에 원래 사용하던 junit5로 넘어갈까 하였으나 junit5를 사용하려면 설정을 spring boot으로 해야 한다는 글들이 있어 같은 테스트 환경을 만들기 위해 junit만 4.12 버전으로 업그레이드한 후 테스트를 진행하였는데 spring 프로젝트지만 config 설정들을 boot 처럼 java 파일로 관리하는 형태여서 java 파일과 properties 파일을 동시에 잡아 줄 필요가 있었는데
@Contextconfiguration(classes = {블라블라…}, locations = {블라블라…})로 잡으니 에러가 발생하여 해결한 방법을 작성해놓는다.


본론

코드

1
2
3
4
5
6
7
@ContextConfiguration(classes = {
DatabaseConfig.class,
SecurityConfig.class,
SocialConfig.class,
EnumConfig.class,
WebMvcConfig.class
}, locations = "classpath:properties/test.properties")

서론에 적은 것 처럼 classes와 locations를 둘 다 설정하였더니 아래와 같이 에러가 발생하였다.

에러

1
2
3
4
5
6
7
8
9
10
11
12
13
14
15
16
17
18
19
20
21
22
23
24
25
26
27
java.lang.IllegalArgumentException: Cannot process locations AND classes for context configuration [ContextConfigurationAttributes@64c87930 declaringClass = 'com.xxxx.xxxImplTest', classes = '{class com.xxxx.config.DatabaseConfig, class com.xxx.config.SecurityConfig, class com.xxx.config.SocialConfig, class com.xxx.config.EnumConfig, class com.xxx.config.WebMvcConfig}', locations = '{classpath:properties/test.properties}', inheritLocations = true, initializers = '{}', inheritInitializers = true, name = [null], contextLoaderClass = 'org.springframework.test.context.ContextLoader']: configure one or the other, but not both.

at org.springframework.util.Assert.isTrue(Assert.java:68)
at org.springframework.test.context.support.AbstractDelegatingSmartContextLoader.processContextConfiguration(AbstractDelegatingSmartContextLoader.java:154)
at org.springframework.test.context.support.AbstractTestContextBootstrapper.buildMergedContextConfiguration(AbstractTestContextBootstrapper.java:371)
at org.springframework.test.context.support.AbstractTestContextBootstrapper.buildMergedContextConfiguration(AbstractTestContextBootstrapper.java:305)
at org.springframework.test.context.support.AbstractTestContextBootstrapper.buildTestContext(AbstractTestContextBootstrapper.java:112)
at org.springframework.test.context.TestContextManager.<init>(TestContextManager.java:120)
at org.springframework.test.context.TestContextManager.<init>(TestContextManager.java:105)
at org.springframework.test.context.junit4.SpringJUnit4ClassRunner.createTestContextManager(SpringJUnit4ClassRunner.java:152)
at org.springframework.test.context.junit4.SpringJUnit4ClassRunner.<init>(SpringJUnit4ClassRunner.java:143)
at sun.reflect.NativeConstructorAccessorImpl.newInstance0(Native Method)
at sun.reflect.NativeConstructorAccessorImpl.newInstance(NativeConstructorAccessorImpl.java:62)
at sun.reflect.DelegatingConstructorAccessorImpl.newInstance(DelegatingConstructorAccessorImpl.java:45)
at java.lang.reflect.Constructor.newInstance(Constructor.java:423)
at org.junit.internal.builders.AnnotatedBuilder.buildRunner(AnnotatedBuilder.java:104)
at org.junit.internal.builders.AnnotatedBuilder.runnerForClass(AnnotatedBuilder.java:86)
at org.junit.runners.model.RunnerBuilder.safeRunnerForClass(RunnerBuilder.java:70)
at org.junit.internal.builders.AllDefaultPossibilitiesBuilder.runnerForClass(AllDefaultPossibilitiesBuilder.java:37)
at org.junit.runners.model.RunnerBuilder.safeRunnerForClass(RunnerBuilder.java:70)
at org.junit.internal.requests.ClassRequest.createRunner(ClassRequest.java:28)
at org.junit.internal.requests.MemoizingRequest.getRunner(MemoizingRequest.java:19)
at org.junit.internal.requests.FilterRequest.getRunner(FilterRequest.java:36)
at com.intellij.junit4.JUnit4IdeaTestRunner.startRunnerWithArgs(JUnit4IdeaTestRunner.java:49)
at com.intellij.rt.junit.IdeaTestRunner$Repeater.startRunnerWithArgs(IdeaTestRunner.java:33)
at com.intellij.rt.junit.JUnitStarter.prepareStreamsAndStart(JUnitStarter.java:230)
at com.intellij.rt.junit.JUnitStarter.main(JUnitStarter.java:58)

해결

@Testpropertysource(classpath:””)로 test properties를 잡아주고
@Contextconfiguration(classes = { XXXConfig.class}) 로 Java config 파일들을 잡아준다.

1
2
3
4
5
6
7
8
@ContextConfiguration(classes = {
DatabaseConfig.class,
SecurityConfig.class,
SocialConfig.class,
EnumConfig.class,
WebMvcConfig.class
})
@Testpropertysource("classpath:properties/test.properties")

댓글 공유

서론

많은 블로그 서비스 중 필자는 Git, Github를 활용해서 사용하는 hexo로 github 블로그를 선택했지만, 다른 블로그 서비스들과는 달리 설치형 블로그의 특성상 설치된 PC가 아닌 경우엔 블로그에 글을 작성하는 일이 쉽지 않고, 블로그가 설치된 PC가 고장이라도 나는 날에는 고스라니 블로그를 날려버리는 상황이 닥치는 경우도 왕왕있다. (예로 필자는 블로그를 설치한 HDD가 고장나 블로그를 새로 작성했다.) 이런 경우를 방지하고, 블로그 작성의 확장성을 위해 github을 이용해 Hexo 블로그를 back up 하는 방법을 알아본다.


방법

post와 테마를 저장 할 저장소 생성
  1. 우선 위 사진처럼 github에서 테마와 post를 저장 할 repository를 생성한다.
    이 때 테마를 저장 할 저장소의 이름은 테마와 같게 한다.
설치한 테마의 저장소 변경
  1. 테마를 저장하기 위해 연결된 원격 저장소의 위치를 확인하고 설치한 테마 폴더 안에서 git 원격 저장소 주소를 변경한다.
  2. 변경 후 테마용 저장소에 테마를 push한다.
push 된 테마 확인
  1. 위 처럼 정상적으로 저장되어 있는지 확인하고 themes 폴더안에서 테마를 삭제한다.
  2. git의 submodule 기능을 이용해 저장한 테마를 submodule로 추가하는데 이 때 디렉토리의 위치는 themes 폴더 내로 이동해서 submodule 기능을 실행한다.
1
git submodule add 테마 저장소
  1. post를 저장 할 저장소 주소를 추가한다.(cotent)
1
git remote add content post 저장소
post 저장 확인
  1. post 저장용 저장소에 내용을 push하고 정상적으로 저장되었는지 확인한다.
  2. 이 후엔 post 작성 후 post만 content 저장소로 push해주면 된다.

결과

이제 우리는 불미스러운 사고로 블로그가 설치된 HDD가 고장나거나(ㅠㅠ), 블로그가 설치 안된 다른 PC or 노트북에서도 백업된 theme와 post들을 다운받아 블로그를 작성 할 수 있게 되었다.

여담이지만, 과거로 돌아간다면 나는 velog를 사용 할 듯 싶다.


참고 사이트

댓글 공유

  • page 1 of 1

Junggu Ji

author.bio


author.job